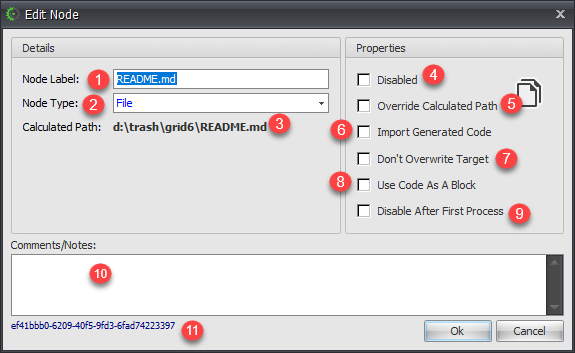
4.Disabled: When this is checked then the node becomes disabled and the code generation command/cycle will bypass this node when executing. The icon of this disabled node changes to show the disabled state. 
5.Override Calculated Path: This allows you to manually specify the path of the generated code for that node. 6.Import Generated Code: When this is checked, the code tree automatically imports files generated by that node into the code tree. 7.Don't Overwrite Target: You will check this if you do not want the overwrite any existing file of the same name as the node. This may be necessary in the case that you have made some modifications to a prior generated file. This, however, is not advised. 8.Use Code As A Block: When this is checked, CodeStencil will expand the string or execute the Code Nanite as a block of code. For example, assuming: (a) You have an expander MENU_ITEMS with this string: "index|about|Services|portfolio|Blog|Contact", and;
(b) Your node contains this code:
<nav class="main-menu">
<ul>
<li><a href="/[%MENU_ITEMS%].html">[%MENU_ITEMS%]</a></li>
</ul>
</nav>
|
(c) When you generate the code for this node with the "Use Code As A Block" UNCHECKED, this is what is generated:
<nav class="main-menu">
<ul>
<li><a href="/index.html">index</a></li>
<li><a href="/about.html">about</a></li>
<li><a href="/Services.html">Services</a></li>
<li><a href="/portfolio.html">portfolio</a></li>
<li><a href="/Blog.html">Blog</a></li>
<li><a href="/Contact.html">Contact</a></li>
</ul>
</nav>
|
(d) When you generate the code for this node with the "Use Code As A Block" CHECKED, this is what is generated:
<nav class="main-menu">
<ul>
<li><a href="/index.html">index</a></li>
</ul>
</nav>
<nav class="main-menu">
<ul>
<li><a href="/about.html">about</a></li>
</ul>
</nav>
<nav class="main-menu">
<ul>
<li><a href="/Services.html">Services</a></li>
</ul>
</nav>
<nav class="main-menu">
<ul>
<li><a href="/portfolio.html">portfolio</a></li>
</ul>
</nav>
<nav class="main-menu">
<ul>
<li><a href="/Blog.html">Blog</a></li>
</ul>
</nav>
<nav class="main-menu">
<ul>
<li><a href="/Contact.html">Contact</a></li>
</ul>
</nav>
|
9.Disable After First Process: When this is checked, it means that this node will be automatically set to a disabled state once the code generation has run at least once. This is quite useful where you have a pop-up form that you want to update just once. 10. Load Code Nanite: This allows you to load the Visual Studio solution that belongs to the Code Nanite attached to this stencil.
|