You can access the Stencil properties in 3 ways:
(1) Double-Click on the root folder, (2) From the context menu, (3) From the File menu

Stencil Properties Form

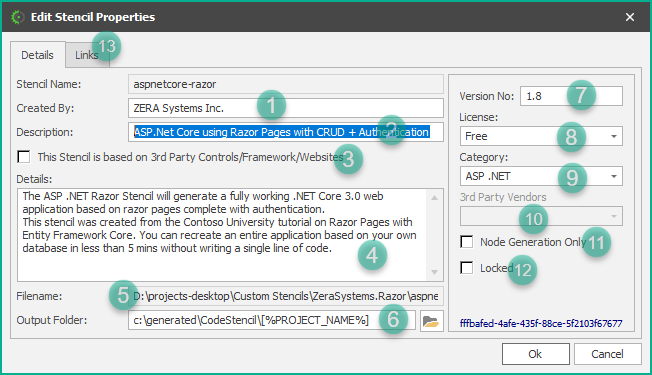
1.Created By: Identifies the creator of the Stencil. It is pre-filled with the username from the machine.
2.Description: This describes the Stencil.
3.3rd Party Controls/Framework/Websites:
4.Details: This just contains more detailed information on the stencil
5.Filename: This is the physical filename of the Stencil file.
6.Output Folder: This is the folder the code will be generated.
7.Version No: This is the version number of the Stencil.
8.License: The following are options that can be selected as the license type: Free, Paid Subscription, GNU/GPL, MIT Software Licensing
9.Category: The options available include; ASP .NET, Blazor, WinForms/WPF, Xamarin, JavaScript/Angular/React/Vue, Sql, Others.
10.3rd Party Vendors: The available options are: DevExpress, Infragistics, SyncFusion, Telerik
11.Node Generation Only: You check this option when you do not want to generate an entire Stencil, and would rather generate one node at any given time. A typical case would be when you have snippets of code in those nodes for specific blocks of unrelated code and you just want to generate ad-hoc based on the specific code you want. When you check this, the code generation button on the toolbar becomes disabled, so then, only one node at a time can be generated.
12.Locked: The usual practice is to lock a Stencil before shipping so that all the nodes are set to read-only. This will help prevent your end-users from making unintended changes. You create a project from a stencil and the project is what you should make changes to.
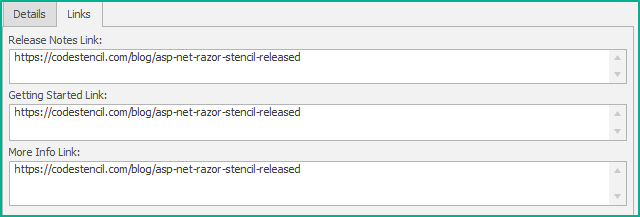
13.Links: This tab allows you to specify links to Release Notes, Getting Started, and More Information (if any)

Name: This is the name of the Stencil. It is the same as the filename and cannot contain illegal characters. It is read-only on the form.
Created By: Identifies the creator of the Stencil. It is pre-filled with the username from the machine.
Description: This describes the Stencil.
Version: This is the version number of the Stencil.
Filename: This is the physical filename of the Stencil file.
Output Folder: This is the folder the code will be generated.
Stencil Type: This indicates the type of Stencil. It only serves a labeling/identification purpose and does not determine the type of code generated in any way.
Comments/Notes: You can add comments here.
Locked: The usual practice is to lock a Stencil before shipping so that all the nodes are set to read-only. This will help prevent your end-users from making unintended changes. You create a project from a stencil and the project is what you should make changes to.
Node Generation Only: You check this option when you do not want to generate an entire Stencil, and would rather generate one node at any given time. A typical case would be when you have snippets of code in those nodes for specific blocks of unrelated code and you just want to generate ad-hoc based on the specific code you want. When you check this, the code generation button on the toolbar becomes disabled, so then, only one node at a time can be generated.